

And here's the AFTER! We hired a local woodworker named Jason Bradley to create these builtins for us. For his first set of builtins, they're awesome! He installed them then I caulked every seam and painted them (a whopping 4 coats, including the primer!) The first two finish coats I was using the wrong paint, which my kitchen cabinet painter told me when he saw me doing it. I would have only needed 2-3 coats if I had used the right paint right from the start so it covered everything and the wood didn't soak it all up. The paint he suggested was Sherwin Williams Emerald. We matched the white of the builtins to the white of our trim.
We opted for closed storage on the bottom half with shelves up above for displaying decor. I took these photos back in June, which is why you'll see the peonies ;) I still need to get hardware for the bottom cabinets, but I've decided on glass knobs! I'm thinking these or these hexagon knobs.

Once the builtins were in, we had an outlet installed above the mantle. Then my husband installed some 2x4 framing and then nailed in the shiplap to the 2x4's so that there would be something to nail it into but also so the outlet would have a space to sit behind the tv (our exterior wall is brick, so it couldn't go directly in the wall). Once the shiplap was up I painted that. Our builder also built a new, sleek mantle without as much fuss as the old one. I wanted something much simpler and I'm so happy with this one! Can't wait to hang some stockings!!

You might remember I stenciled our fireplace mantle and showed you how in this post! I'm so happy with it and glad to report it's holding up great!

The other thing we did (and by "we" I mean my husband ;)) was install can lights in the room. Before we had no overhead lighting and now we have 4 recessed cans on a dimmer and they make such a huge difference!! We centered the 4 lights on the bay window and it turned out great.
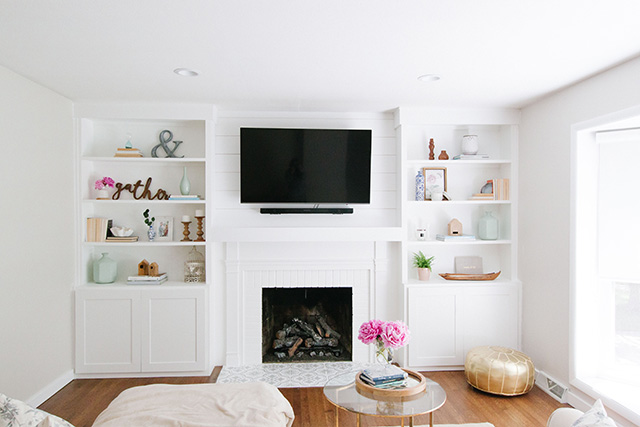
Here are some close ups of the builtins and our decor. Stay tuned for Thursday when I'll show you some styling tips for bookshelves-- I took photos this weekend and I'm excited for the post to go live this week because I'm showing you the right and wrong way to style your shelves. Hopefully it'll be really helpful!


One more time...
BEFORE:


It looks like a completely different room now! I love it!! Y'all did a wonderful job!
ReplyDelete