I've always LOVED doing hair. So much so that when I was little, I wouldn't even let my mom do it cute-- I would always do it myself. Pretty sure I arrived at the hospital to meet my baby brother at the age of 3 with tons of plastic hair clips and too many ponytails to count! I think this is actually where my creativity first came out and despite some ridiculous hairstyles that are memorialized in photo books, I'm thankful my mom let me play around and experiment in this department. (Though I'll be begging God to bless me with a daughter who lets me do her hair cute all the time! ;))
I have really thick hair, which is great in some ways because it holds a curl really well. But it's also a bit course (thanks, mom) which means there is no air-drying for me! I've always loved curling my hair (straightening takes too long), but just curling it every day and leaving it down can get boring. I'm sharing a couple SUPER SIMPLE, like can't-believe-I'm-making-these-into-a-tutorial-simple, hairstyles I do once my hair is curled.
The first one is one I do all the time. On the opposite side of the way my hair parts, I take a small section of hair at the top by my part.
Twist it back, holding it in the direction you'll be pinning it. This just needs to be a loose twist (anything tight and you'll lose the volume at the top). Take your bobby pin and grab the twisted hair from the back, pushing the open end of the pin forward in the hair. The pin will be held in place and hidden under the twisted piece.
The second one is also extremely easy! I'm sharing this one because I was wearing this style on Instagram a couple months ago and got a few questions about it. This is like a classier play on a middle school hairstyle ;)
Once your hair is curled grab the top section of hair, leaving some to cover your ears (at least, that's how I like it best).
Get a small elastic and start putting that top part of hair into a LOOSE, tousled (read: do not slick back) half-up ponytail. Instead of putting the hair through the loop on the last go around, leave the tail in creating a bun.
We want this to look messy, so I jostle it around a little and pull some hairs out if needed (by the way, this totally goes against my perfectionist tendencies ha!)
In order to get some volume from the front, push your bun a little and secure with two hair pins.
Easy-peasy!
Hope these two little ideas spark some inspiration in the hair department!
One of the most frequently asked questions I get is how I curl my hair, if you can believe it! I thought I'd give you a little video tutorial of how I do this-- hopefully it helps. Just to preface, I have pretty thick hair, with a bit of natural waive, which I try to blow dry out when I'm drying it.
Before I blow it dry, I use: Aveda's Smooth Infusion, making sure to run it through my entire head of hair (but trying to avoid the top, where it might get greasy) then Surface's Bassu Oil, which is one of my favorite hair products EVER! Also makes great shoulder massage oil. I run this through only the ends of my hair, before and a little after blow drying.
Once it's all dry, this is how I curl it! The most important thing to note is how I unwrap my hair when I release the curl. I twist it around itself as I release to give it more of a curl. The other important note is that I hold the curl in my hand for a few seconds to let it cool and "set". Finally, I don't run my hands through my curls until after I it's all had a chance to cool.
After I run my fingers through it, I finish it off with a touch of hairspray. I'm using DryBar's right now and really liking it. Also, I can usually go 3 days without washing my hair. I had to train my hair to do that-- it used to be only 2 days. But the longer you go without washing, the more your hair learns to control its' oils. Funny how that works! On the second day, I recurl it if I need it and then on day 3, I usually do a ponytail or half up / half down.
This is just the way I do my hair, certainly not right or the only way ;) Let me know if you have any questions!
Hi there! Hope you had a great weekend. What'd you all do? We went to a graduation party, worked out, went to church, and soaked up even more sun...hooray! Today we're sharing an easy summer style. I love wearing my hair parted to one side with the side with less hair in a little twist. But that gets old quick, so my friend and hair stylist, Chelsea, came up with a little "twist" on the style (pun intended ;)) Tutorial is below!
1. Start with lose curls. For tips on how to get your curls to look like this, check out THIS hair tutorial. We also want to mention that to prep the hair well (meaning, if your hair is too slippery, it won't hold!) you should be dusting some Push Powder into the scalp to create volume and good base for any style.
2. Side part your hair. We're going to be working on the side with less hair.
3. Grab a small section of hair 1/2-1" back from your hairline and twist it away from your face.
4. Secure upwards with a bobby pin, shoving the pin in the same direction as the twist, so you can't see it.
5. Now take the hair that's left in front of your ear and divide into two sections, then twist the two pieces together away from your face. We're doing this to add texture and interest.
6. Secure this twist with a pin or two on top of the first secured twist, also hiding the bobby pins.
7. Gently tug on the tops of the twists to create some volume. Finish with some hair spray.
I used to do some hair tutorials when I was in college here on the blog, so it didn't surprise me that I've had a few requests for more of those. Lucky for me, one of my best friends, Chelsea, is a hair stylist (she does my hair here in Michigan! If you're looking for a stylist in West Michigan, let me know and I'll give you her info!), so she was kind enough to come up with a few styles to show you all. Not only was she a bridesmaid in our wedding, but she also did all my other bridesmaids' hair for our big day! You can see them here. My other sweet friend Rachel took all our photos for us.
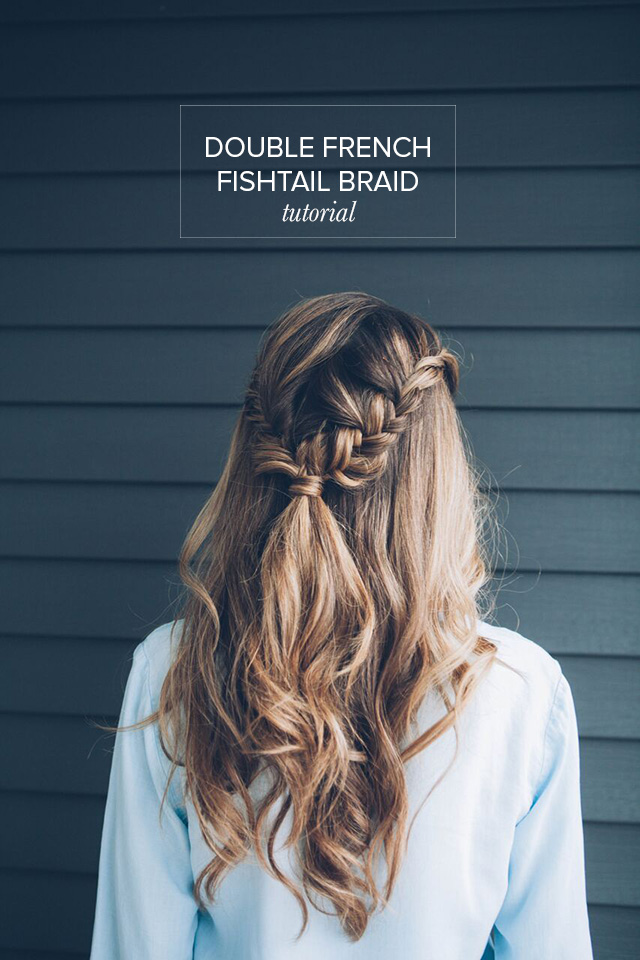
Today we're showing you this double french fishtail braid:
1. Start with loosely curled hair. Get our best tips to get loose curls like those above HERE.
2. Part hair at your normal part line.
3. Begin a fishtail braid hair at top of forehead. To do this, gather a small section of hair and divide into two sections, as opposed to three sections like you would do for a normal braid.
4. Continue the french fishtail braid by adding hair from only the top side closest to your part, into the braid. A fishtail braid is best described as criss crossing pieces of hair into the two original strands.
5. Continue until you get to the back of your head. Once you can't add anymore hair, continue a traditional fishtail braid halfway down and secure with elastic.
6. Do the above steps to the other side of your head and secure that braid with an elastic as well.
7. Grab both braids and secure elastic where they meet. Take out the other two elastics.
8. To finish it off, wrap a small piece of hair around the elastic so you can't see it anymore. For tips on how to do this and get it to stay all day, check out our last hair tutorial here.
Viola!
Even if you can't master this fishtail version, you can try this look with even a regular braid or twists!
Hi friends! Back in January I gave my readers a survey and asked for post topics you were all interested in reading about. I used to do some hair tutorials when I was in college, so I did get a few requests for more of those. Lucky for me, one of my best friends, Chelsea, is a hair stylist (she does my hair here in Michigan! If you're looking for a stylist in West Michigan, let me know and I'll give you her info!), so she was kind enough to come up with a few styles to show you all. Not only was she a bridesmaid in our wedding, but she also did all my other bridesmaids' hair for our big day! You can see them here. My other sweet friend Rachel took all our photos for us.
Anyways, we're doing two styles today + showing you a new way to curl your hair!
CURLS:
1. Section off hair into layers. If you need to spruce up your hair on the second or third day without washing it, I love this Amika dry shampoo.
2. Curl a small section, starting at the mid-to-root area of your hair. Don't start from bottom and roll the iron all the way up.
3. Tip for texture waves: when releasing the curl, twist the hair around the rod. Watch the video to see what we mean...
4. At the hair in front of your ear, curl AWAY from your face. Hair after the ear, curl away, then towards, away, then towards. Alternating every other one.
5. Holding the curl in your hand while it cools will "set the curl", which means it will help it last longer.
6. Run your fingers through the curls.
Half Up Do:
1. Put in a little dusting of Push Powder (or anything that helps increase volume). Tease the base at the crown in sections, then smooth the top section so it's not rough/matted.
2. Gather a section of hair at the crown area, leaving the hair in front of the ear out and maintaining your part in the front.
3. Secure with hair pins-- don't worry about them being seen, as we are going to cover them up.
4. Grab the hair in front of the ears, twisting as you pull it to the back to cover the hair pins from step three. You can try to conceal these hair pins a bit if you want to leave this style down as seen below. If you can't cover the pins, not to worry! We're going to pull the hair into a pony tail and remove the pins that you see.
Tip: be sure to leave out a few strands of hair by the face for an effortless look.
Glam Ponytail:
1. Complete the above steps 1-4 to create your base.
2. Grab the rest of the hair at the base of the neck and secure with elastic.
3. Remove visible hair pins from the twist. Do not remove the original bobby pins we put in in step 1 above, which made up the base of the half up do.
4. Take a small section of the under part of your ponytail and wrap around the elastic to conceal. In order for it to stay put, twist the end of the small section of hair around a bobby pin as shown below. Then secure the pin up through the base of the pony tail.
Twisting it around the bobby pin ensures it won't come unraveled from around the elastic. LOVE this tip!!
I love this glam version of a low pony! I can even see myself making it a bit simpler by doing less twists. Can't wait to play around with it! Let me know how it goes if you try it out :)
Incase you're wondering what products I use, here they are below. I love Aveda & Pureology products. I switch between those two brands for my shampoo and conditioner. I LOVE the Aveda damage control, which also helps detangle your hair -- I put this on first thing out of the shower. I also have both the brushes below, but definitely prefer the Aveda brush. It doesn't even hurt to brush out my hair! I've got some seriously thick locks, so that says a lot.
If you're wondering where I got my shirt, it comes in two colors and they were just restocked! This is one of my favorite shirts ever. It feels like a blanket, it's so soft! And free shipping right now (4/26)
If you're wondering where I got my shirt, it comes in two colors and they were just restocked! This is one of my favorite shirts ever. It feels like a blanket, it's so soft! And free shipping right now (4/26)