Teenage Coastal Bedroom Reveal

This particular project has been a true joy for me! I have been working with Maggie for a few years on other parts of her home (coming soon!), so when she told me she wanted to redo her 12 year old daughter's room for her upcoming birthday, I was so excited. Turns out that Kate had a vision for her room and I was SO on board with her white, blue and gray coastal vision!

Let's start with the BEFORE...

It was still her "little girl room", perfectly purple and flowery. Kate wanted everything to be changed (except we kept her desk, which is a great size for the room) and made a much more grown up design plan for her! 


Her closet situation was one of the main things we addressed, which though I didn't give you an inside tour of, you can still see we added proper closet doors and had a closet design company install the perfect closet system for her! It's so much more functional now. 

OUR DESIGN PLAN:


With the main goal of making the room light, bright, and feel a lot bigger than it is (it's tiny!), we selected bedding that would help with those things and go with our slightly coastal nod. Touches of gold would help warm it up and give it a fun, feminine touch. 

THE REVEAL


Kate wasn't so sure she wanted any trim work on her walls, but after I explained how simple board and batten would help make the room look taller, she agreed. We all decided it's one of the best things we did for the space! It really added so much height. 


Her little desk space turned out so cute with her old desk, an updated chair and some simple accessories.


We upgraded her from a twin to a full bed and since the room is small to start with, we had to push it against the wall and do one nightstand on the right side of the bed. The nightstand being just under the window, I think it turned out great!


A cozy, inviting bed was a must! I fell in love with this sweet bedding and luckily, so did Kate and her mom!


A little burst of color above the bed brought in warmth and tied the coastal vibe in.


On the other side of the room, we did shelving for her to display some books, photos, etc. 


We also hung a large bulletin board for to display all of her photos!

The little pom-poms on the simple white curtains adds so much personality to the room. I think it's one of the things that still makes it feel like a teenager's room, while being updated and grown up. These curtains are layered on top of our roller shades, which we had custom made in black out. This eliminated the blinds and made the room look a lot more elegant, but also functional!

She didn't have a full length mirror, so we made sure to fix that for her!


I am so pleased with how this sweet room turned out and I hope Kate will enjoy it for years to come! (Heck, as a 31 year old, I know I would enjoy it ;))

Happy Monday!


interior design website / services / portfolio


If you're in search of design services for your home, I would love to help! I offer both full-service packages for local West Michigan residents and one hour consultations for virtual clients. Email me today to inquire! hello@michaelanoelledesigns.com


0

Coastal Powder Bathroom Reveal


I spent a couple weeks in California in September to visit my family and meet my new niece (my first on my side of the family!) If you remember, my parent's just recently moved so I've been helping them design their new home. One of the most fun projects we've been working on is their powder room. I shared the design plan with you here and since then, it's been completed! 

Here's where we started! This is how it looked when they bought the house:

This was the design plan:

And this is how she turned out!


We are all SO happy with how this room turned out. The style we're going for throughout the home is a coastal-farmhouse look, so we wanted to carry that into the bathroom as well. We started by removing the old vanity and sink (I've never loved above-counter sinks), removing the light fixture and putting up the most beautiful wallpaper. We went with gold accents in the lighting and faucet and one additional element that wasn't in place in these photos. We found these mother of pearl/brass knobs for the vanity and they truly tie everything together!!

My parent's had this gorgeous piece of art from their old house, so we hung it in here and it just completes the coastal look perfectly.

What do you think?! Hope you have a great week,
xoxo


interior design website / services / portfolio
0

Client Powder Bathroom Design Plan


Happy Thursday, friends! Hope you'r enjoying your first few weeks of August! As you might remember, I was visiting my parent's during the middle of July at their new home in California. It was definitely a work trip, as we spent almost all our time shopping for furniture and decor for the house, since it needed a lot of pieces to fill it out. While not much larger in square footage than their last house, the scale is much larger with 12' ceilings in some rooms and 9-10' ceilings in every other room. Scale is everything!! So we had to get appropriately-scaled items for the house. If you fill a large-scale home with small furniture that looked nice in a normal-scale home, you will end up with that furniture looking like dollhouse furniture in the new space. We have a lot of furniture on order and it will start rolling in shortly! The delays the last year and half have been insane and they are not even close to catching up, sadly. So we're hoping most things come in before Christmas, if we're lucky -- ha!

Anyways, I forgot to share a couple projects we were working on while I was there. One of them is their powder bathroom glow-up. It's not a total gut, but it's getting a substantial makeover-- so much so that you probably wouldn't even recognize it when it's done. Love these kinds of attainable projects with such impact!

Here is the bathroom BEFORE we touched it:

Like most of the house, it has beautiful trim work as seen in the wainscoting and the shiplap ceiling, but the sink and vanity situation needed help! I'm not a fan of basin sinks that sit on top of countertops like this for many reasons, but one being that you lose almost all counter space. The second thing we needed to address was the lighting. It was so dark in here with just that one vanity light. 

To combat this, we added a recessed light in the ceiling and we got a new (gold!) vanity light with three lights to offer more light. The entire vanity is going, in favor of a more traditional looking vanity, an under-mount sink with a marble countertop, new gold faucet, new mirror, and my favorite feature-- we're wallpapering everything above the wainscoting! I'm so excited about this room I could squeal!

Here's the mock up I created to give you a pretty accurate depiction of the final look we'll get:


Everything in the mock up is exactly what we have picked out for the room. This vanity actually reads more light blue-gray in person, so it's going to be perfect with our Serena & Lily wallpaper (we found it at the outlet for $39 / roll...what a find!!) We're going to change the basic knobs that come on the vanity out for gold ones that will tie together the light and faucet. The mirror is just gorgeous and perfect for the coastal farmhouse feel we're going for. It almost looks like coral reef!

I can't wait to see this space come together. The wallpaper goes up on August 23rd, so it'll start take shape after that. Hooray!


Enjoy the rest of your week
xoxo


interior design website / services / portfolio
0

Client Project: Living Room Shelf Styling

Happy Monday! I'm so excited to finally share some client design work with you after months of having no content to share from my projects (thanks, Covid!) I'm hoping to have more to share soon as a couple projects are starting to take shape and come together in the final stages!

This home is one I've been working on since early June. I love this couple so much! We met because the husband is our mortgage lender...that's small town Michigan for you ;) I was thrilled when he asked for me to come by for a consultation as they prepared to redo their main level. They've lived here for 5 years and were ready for an update!

Here's a BEFORE photo of this room. I'm not going to share the entire reveal yet (it's not quite done!) but I thought this would give you a good picture of where we started. The floors were a dark cherry laminate and they were really in need of some updating. The first thing we did was choose new beautiful flooring, paint, and get new furniture. I'm actually the new owner of their living room sofas and earned myself "wife of the year" award, as I put away my own style preferences and knew my husband would love these leather couches (each seat reclines--such a man cave thing ;)) for our new basement! It's all about compromise, people :)


Now that most of the furniture is ordered and things are taking shape, I went shopping for our styling pieces for the bookshelves. These are HUGE and so the items I found needed to take up a lot of visual space to make it proportionate to the 10' ceilings. 

Here are the BEFORE'S of the shelves:


Here's how they turned out! They're not fully complete as we're missing some pillar candles and photos to fill the frames, but it's almost there and I'm loving it. I'm so sorry to say, none of these items are linkable online. I found them all at a local shop!


This vase is absolutely stunning and pulls in the blue hues from the rug.


Turning books the opposite way on the shelves, so that you see pages instead of spines, is a great way to unify your shelves! The color of the spines is taken out of the equation, giving you a lovely neutral base.


Here is the other side of the shelves. I'm so excited to get some doors on the TV area and the compartment next it. It's going to be SO much more cohesive!

Excuse the big mirror in the photo-- that's going above the fireplace soon :) It's gorgeous! (This is the back of it obviously.)


One element I think is so needed in shelf styling are big, beautiful coffee table books. These give you a large surface to stack other objects on and helps create levels. I am always mindful of the color of these spines, just so that we don't have a rainbow of color going on ;) I have a ton of favorites linked in my Amazon storefront under "books" here, but I'll also include my favorites in a short list:

Travel Home
The Inspired Room
Homebody
Styled
Domino
Cut Flower Garden
Down to Earth
Made for Living (on my Christmas wishlist!)
The Sea
Elements of Family Style
The Year of Cozy


I always have my clients get 5-7 books before I arrive to style their shelves. In this case, we'll use leftover books to style the console table behind the sofa and the coffee table. I can't wait to share this reveal soon!

xoxo


interior design website / services / portfolio
1

Virtual Consultation Master Bedroom Reveal

Happy Wednesday! I'm excited to share a really pretty client reveal with you today. This one is a little different because it was a virtual design client! I FaceTimed with Lindsey a couple months ago to do our initial consult for her bedroom, then I sent her my recommendations, along with an inspiration board she got with her package, and then she executed the design on her own. I'm so thankful she is a Pennsylvania photographer, so I'm able to share some pretty photos with you!

Lindsey and her husband started with a fairly blank slate. They kept their headboard, but that was about it (other than a dresser I gave Lindsey some instructions on how to refinish!)


As you can see, the room needed some love :) 

Here is the inspiration board I came up with for them after our initial consultation. These boards are to show some specific pieces I recommended to her, but mostly to help form an idea of the feeling of the space. You'll see the finished room feels very similar to this, though some of the pieces are not identical. 


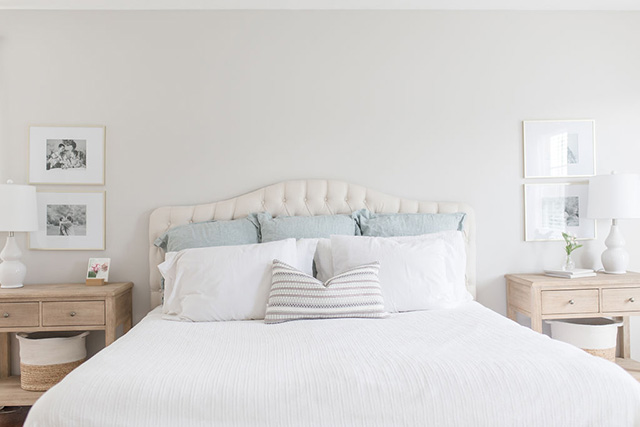
Besides a round mirror that's been delayed for above her headboard, the room is done and it's so lovely! It's nice and bright, airy, classic, and polished. I love how it turned out! From Lindsey...

"It was so wonderful working with Michaela on my Master Bedroom Design! I have been following Michaela on Instagram for a few years now and I have just fallen in love with her work! I contacted her for a virtual design consultation and I am so happy I did! I sent her photos of my room and filled out her questionnaire and then we went over it all on FaceTime. I was unsure of my specific style but explained to her that I love light, airy and ‘clean’ looking spaces. I love soft neutral colors and explained that I was not a fan of anything too bold and wanted more blues since my husband is not a fan of pinks/purples in our room ;) And let me tell you, Michaela NAILED it!"


 "She sent me several options for every area of the space I wanted designed. It was so hard to pick the items because I loved everything she chose! My budget didn’t allow for a new dresser, so Michaela even sent me her step by step guide on how to paint my current one, and it came out beautifully! I am IN LOVE with my bedroom now and couldn’t be happier with all the help from Michaela, I would not have been able to do this on my own! As a mom of three little ones, I now have a beautiful place to retreat to at days end!" -- Lindsey


This is the same dresser as before, but she refinished it and gave it a whole new life. 


If you're not local to West Michigan, but feel like you need help finishing off a space in your home (or have little questions all around your home), I'd love to help you! I'm taking limited number of consults per month, now that my local client projects are back up and running. Take a peek at my website for more details and then please email me at hello @ michaelanoelledesigns.com for details. I can't wait to chat with you about your house!


I hope you have a great day!
xoxo


interior design website / services / portfolio
0

Back to Top