Excuse the big mirror in the photo-- that's going above the fireplace soon :) It's gorgeous! (This is the back of it obviously.)
One element I think is so needed in shelf styling are big, beautiful coffee table books. These give you a large surface to stack other objects on and helps create levels. I am always mindful of the color of these spines, just so that we don't have a rainbow of color going on ;) I have a ton of favorites linked in my Amazon storefront under "books" here, but I'll also include my favorites in a short list:
Travel Home The Inspired Room Homebody Styled Domino Cut Flower Garden Down to Earth Made for Living (on my Christmas wishlist!) The Sea Elements of Family Style The Year of Cozy
I always have my clients get 5-7 books before I arrive to style their shelves. In this case, we'll use leftover books to style the console table behind the sofa and the coffee table. I can't wait to share this reveal soon!
xoxo
interior design website / services / portfolio
Client Project: Living Room Shelf Styling
Friday, November 13, 2020New Living Room Art
Thursday, June 25, 2020
Well FINALLY after having our art prints for the living room for about 5 months, we got them all hung up! We have a big blank wall in the living room, the only spot the room has for art (other than the gallery wall of our wedding photos on the wall behind the sofa). I knew it needed to be large scale and I wanted something fairly neutral with black frames to pick up some contrast from other areas around the room. I love the depth that black creates!
Here is the listing photo of the house:
Here's the room last summer after we installed our builtins:
And here's the room TODAY:
In case you missed any of the previous posts about this room, here's our finished builtins, the DIY hearth stencil, and new rug.
I found this art on Juniper Print Shop's website after scouring it, and right when I saw this I knew it was perfect. I love the modern yet whimsical feel I knew it'd bring to our more traditional space. Juniper Print Shop is one of my go-to's for client art because it's so affordable and you can even choose to print it yourself or have a professional print mailed to you (which is what we did in this case, since it was so large). The art in our dining room is also from JPS and LOVE it.
Large Frames:
Okay, let's talk about the frames. The great thing about JPS are their print sizes are compatible with Ikea frames. This is the Ribba frame in 24x36". I was worried the plexiglass was going to look super cheap, but I'm here to tell you, I'm SUPER happy with it and would use it again and even put it in a client's home. They're really quite easy to hang and very lightweight. While I prefer hanging art with a picture hanging wire and this doesn't have that, you could install them yourself, but otherwise what they came with worked just fine.
Just a note, the frames took TWO MONTHS to arrive to me because of Covid. But they are here and I am so happy. I thought for sure they were gonners ;)
Hanging Height:
You want the center of your art to be about 58-61" from the ground up the wall. Mark this measurement on your wall before starting, then get the center of the art at this location by having one person hold it up, then a second person marking the top of the frame so that you know where the top will be. From there, measure down to the hanging hook to see how far down you need to put your nail in order for the height to be correct. I have a story about this on instagram highlights if you want a more in depth look at how we hang art!
Art Size & Placement:
I'm so happy with the size and that I went with the larger one. I was debating back and forth between this size or one size smaller, but then I remember my golden rule: when in doubt, always go bigger. We centered them on this wall since nothing is along the wall; however, we would love to get a larger sectional sofa soon and if we do, the long part would sit along this back wall and we may have to rehang the art to be centered over the sofa depending on placement and length of the sofa. We'll see!
General Tip: you want your wall art to take up about 1/3-2/3 the size of the wall OR 2/3 the size of whatever it is hanging over (in this case, it's not hanging over anything, but say there was a sofa along this wall-- you'd want to make sure it was about 2/3 the length of that).
Our Dining Room Reveal
Tuesday, April 14, 2020And here's the AFTER!
We switched the light fixture (which wasn't even a proper dining light fixture before, as it was hung way too high- ha!), added a door to the builtin nook, hung curtains high and wide so that the ceilings would appear taller, hung art, got a new table (I designed it and had it built by Haven Creek in Rockford, MI, but they sadly don't do custom builds now), rug and chairs. Phew! Thankfully other than this room, we didn't have to buy any furniture for the new house...we had almost everything we needed for now.
The Light Fixture:
I am so in love with our dining room light fixture from Hudson Valley. It just makes the whole room! The space is long and narrow so I wanted something to really fill up some visual space. The touch of brass picks up perfectly with the gold picture frame behind it. I am so grateful to have partnered with Hudson Valley Lighting on the lighting in our new home! If we move, I'm definitely going to be taking some of them with me, including this one :)
The Table:
We brought the upholstered chairs we had from our old apartment with us and had our table custom made with a bench. It works really well when people come over because you can squeeze lots of people on the bench. The table is 7' long and the top is a gorgeous herringbone pattern. I designed the base of the table to have a pretty, classic, yet simple X base.
Centerpiece hack: $2 Eucalyptus stems will last you forever!! I've had these almost a month now. They take up a lot of space on your table, so they're a perfect centerpiece.
The Artwork:
I knew we needed something large and I wanted something with color to bring in some blues and greens to tie in with the rug and curtains. Large art is expensive and I wanted to be budget conscious, so I turned to one of my favorite resources, Juniper Print Shop. The carry many different artists' work at very affordable prices. You can either get prints shipped to you, or download the file to print yourself. I was so excited to work with them for this piece of art, because the second I saw it, I knew it was perfect. It had deep green tones to play off the curtains, some blues to tie in with the rug, and some blush hues for a pop. I've since connected with the artist on Instagram and she's so talented!
BEFORE:
The Chairs:
I chose our table stain almost a year ago and still hadn't gotten chairs for the other side. One day while shopping for a client online, I noticed these chairs from Pottery Barn were almost identical in color to our table stain! I had some credit to PB, so I ordered them right away. I can't believe it, but the match is almost the exact same. I'm so happy with it! They're a really good price and on sale right now.
The Frame:
I partnered with one of my FAVORITE frame resources, Framed & Matted. Their name is so easy to remember, too! ;) They have simply beautiful frame options to choose from and the sizes are all custom. It's so easy to build your own frame! The museum glass is what I went with and I love how it all looks. I was SO impressed with the quality of the frame, instructions it came with on how to hang it and that they include all the hardware to hang it seamlessly. Our frame is called the Parker.
The sun was shining this day I took photos, so it's making the print look rippled, but I assure you it is not ;)
DIY Mudroom Bench
Monday, November 18, 2019
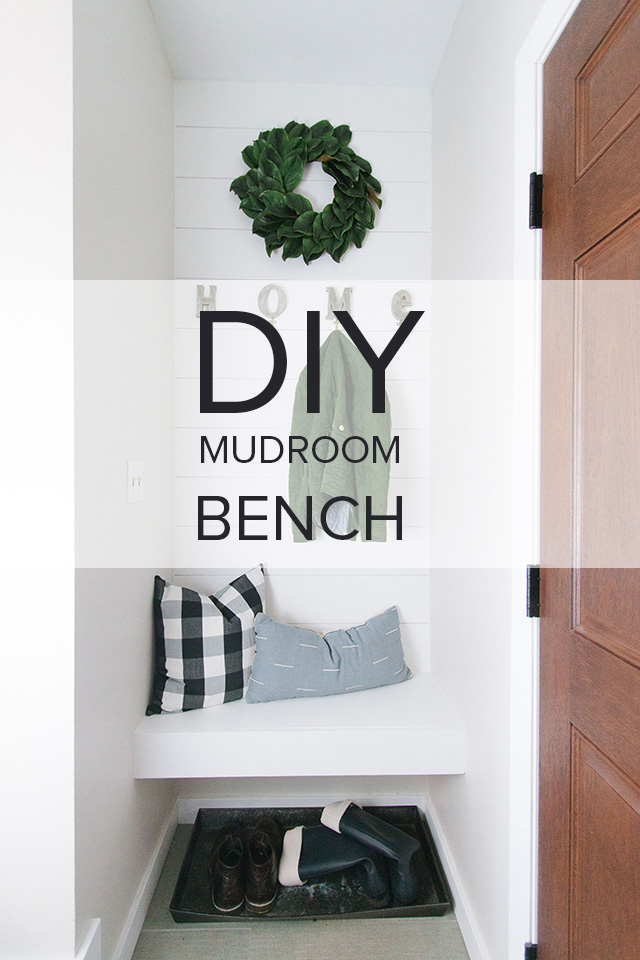
So I had a bit of a blogger fail because my husband ripped out the shelf that was here before, BEFORE he took photos of what it looked like. But this is essentially our "before" photo. Just imagine a really ugly shelf hung above the hooks there. Just so you know how small of a space this is, it's 36" x 18". One day I said "I wish we had a little bench there at the side door" and my husband quickly replied "Oh I can build one!" And off to Lowe's he went ;)
STEP 1: Demo
STEP 2: Get the plywood you need. We did two 1" thick boards for the actual bench, covered by a 4" thick piece to finish it off nicely, then support pieces under the bench to hold it up. These were 2x4's that he screwed into studs in the wall before attaching the actual bench top. We made the top of the bench at 18" off the ground. Our bench measures 36" wide by 16" deep. I didn't want it to take up the entire depth of the nook, so I made it 2" shorter.
STEP 3: We had to patch the walls where the old shelf destroyed it when we took that down.
STEP 4: Get your shiplap. We used this grooved and primed shiplap from Lowes (not sponsored!) Make sure you measure your wall space width and height (we only shiplapped above the bench to save some $) so you get the right amount of boards. The grooved shiplap is awesome. It's what we used above our mantel as well and I'm really happy with it. First, it's easy to lock into place and hide nail holes and second, you don't have to really paint inside the grooves because it's already white (painting inside the grooves would be a huge pain!)
STEP 5: I caulked the seams around all the sides and along the front where my husband applied the finishing piece to make the bench look really thick.
STEP 6: After this dried, I primed the bench with an oil based primer with a brush.
STEP 7: Fill nail holes and spackle.
STEP 8: Paint the shiplap and bench. Yes, the shiplap is white, but it's not the same white as our trim, so I wanted it to all be the same color. I did two coats of the paint with a moleskin roller, as recommended by my kitchen cabinet painter! At this point we also painted the walls because of the repair we had to do. And by "we", I mean McCann ;)
For finishing touches we hung these sweet HOME hooks. I checked for you and all the letters to spell HOME are available. Hooray! I also hung our Magnolia wreath I got from my friend's etsy shop, but she's not making them anymore. There are tons of gorgeous options on Etsy though! I found the gingham pillow at Hobby Lobby last year (but here's a similar one on Amazon) and the lumbar at Target. These are just place holders until I get a bench pad cover made. Then I'll find coordinating fabrics for it!
This little corner might not look like much, but it's a huge transformation for us!! It's already been so nice to be able to sit down and put shoes on and hang coats there! It's also not a terrible eye sore anymore. So thankful that my husband is so handy (which came as a surprise to both of us ;)) Just proof that you can learn anything on YouTube!
Happy Monday!
xoxo
Subscribe to:
Posts (Atom)