
Have you ever wondered what the design process of working with me on your home would be like?! Hopefully more than 5 of you are excited to learn, because I'm giving you some behind the scenes peeks today at a dining room design I'm doing for one of my sweet virtual design clients. Jean and her family live in California and I was fortunate enough to meet her at our last Bloom Workshop in CA. After the workshop, she told me she and her husband just built a beautiful new home and she wanted to hire me to help her with the design of a few rooms in the house. It's always fun to work with someone who I really click with, so I knew this would be a fun project. When I got some pictures of her house in my inbox, I was even more excited. I love working on clean slates like this!
After gathering information about the family's style, taking a peek at her Pinterest boards, and discussing their needs for the space, I got to work sourcing (this is a designer's way of saying "shopping" for the perfect items for a client). For me, I find it easiest to stay organized by having a Google Doc for each client. I organize the doc into categories and rooms (if I'm doing multiple rooms for them) and then any time I find an option that might work for the space, I add the link for it in the doc. This saves me the headache of loosing the items and never being able to find it again ;) Also important to note is that if I were sourcing for dining chairs, when I do my initial cull of dining chairs that might work, I put the links to ALL options I think have potential. Though I might only show the client a few of those (or even just one in the initial inspiration board), I always want to have back up!
Here's an example of the Google Doc system. The items highlighted in pink are the items I showed my clients in the inspiration board.

For Jean and her dining room, she had already ordered her dining room table, so we were focused on finding chairs, a chandelier, and island lighting that coordinated well with the dining fixture. So instead of just making one inspiration board for the room, I decided to send Jean a few different boards with options. I'm going to share those with you here:


You can see that option 3 is a lot more modern than the others. I sent this option to her because she originally mentioned that she wouldn't mind trying something more modern to spice things up. As I was making the board, I knew that it wouldn't fit with the integrity of the house, but I wanted to send the look to her anyways so I could visually explain that to her. I sent these options back to my client and she responded by saying she loved the upholstered end chairs and thought maybe she would love the look of a slipcovered end chair. She also mentioned that she wasn't gravitating towards dark wood for the other chairs. She told me she LOVED the orb chandelier (it's a favorite of mine, too!) so we kept that in the following boards.
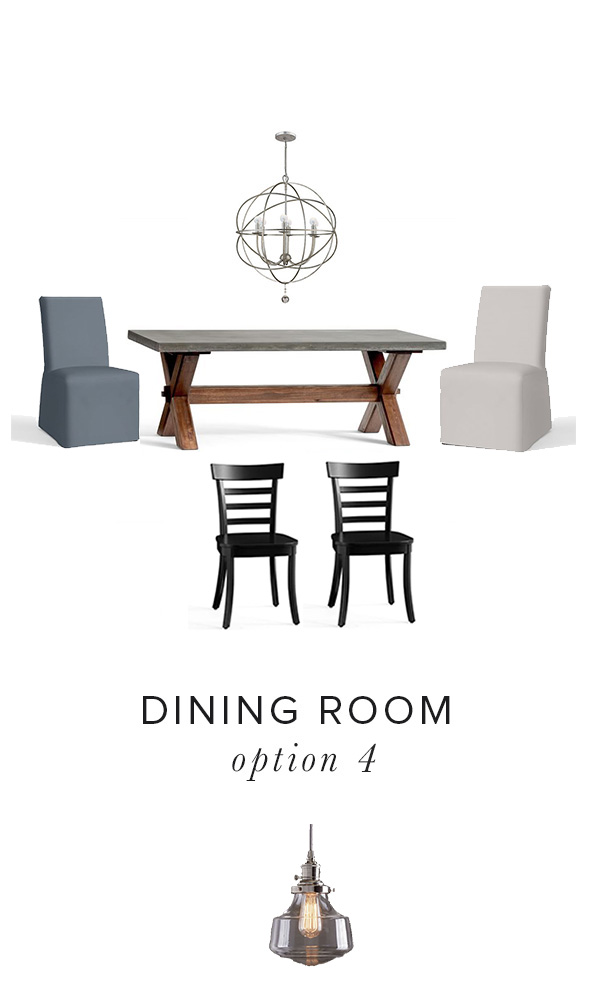
The next board I made was with a slipcovered chair option-- one with an arm and one without. It also included 3 other chair options that reflected the "farmhouse" look Jean told me she wanted, after the initial 3 inspiration boards. Finally, I included 3 island pendant options that coordinated well with the orb chandelier we decided on for the dining room.
I find it SO impactful to show my clients options mocked up, because you don't truly know if you're going to like something together until it's actually visually in front of you (as opposed to sitting on different web tabs, going back and forth to each of them + seeing if they look okay next to each other ;))

She agreed with me, that she loved the slipcovered chair WITHOUT arms for the end chairs. She also told me she preferred option A for the wood chairs, but in black (which I explained in the email was an option). I love adding in the black, because the rug we choose for the family room has black in it, so this will really tie it together. Jean also landed on option B for the kitchen island pendants (there will be 3 in a row...such a statement!)
From there we began choosing fabric for the slipcovered chairs. Jean wanted to see what bringing in some color would look like AND wanted to see a more gray option. I showed her both below, as well as added in the black chairs she decided on and explained that I didn't love the blue tone with the black.
Thankfully, she agreed with me and we ended up going with a Sunbrella fabric in a medium-light charcoal color. This will be awesome because she has kids and Sunbrella fabric is known for being the most durable on the market. It's completely amazing; what started as an outdoor only fabric company, expanded their line to indoor fabrics that are super soft, and they even sell the fabric at places like Pottery Barn now! My parent's sofa is covered in an oatmeal color Sunbrella fabric. They spilled red wine on it within the first few months of getting the sofa, and instead of seeping into the fabric, it balled up and wiped right off! Not even a faint stain remains!!
Anyways, here is the final board for the dining room, along with a trio of mirrors that will go in the great room within eye sight. The only thing left to do is find a rug for the dining room + get the art ordered from Feather & Birch. I can't wait to see this space come together!

table / end chairs- sunbrella charcoal / wood chairs / light fixture / kitchen pendant / mirrors
I hope the progression of this design was fun to see come together! I also hope it gives you a bit of a look into how my design process looks. I always tell my clients that this is all about them. The end goal is for them to be happy and love their rooms! So that's why I put so much care into showing them options.
I can't wait to keep you posted with this project and show you how it turns out soon!
xoxo

After gathering information about the family's style, taking a peek at her Pinterest boards, and discussing their needs for the space, I got to work sourcing (this is a designer's way of saying "shopping" for the perfect items for a client). For me, I find it easiest to stay organized by having a Google Doc for each client. I organize the doc into categories and rooms (if I'm doing multiple rooms for them) and then any time I find an option that might work for the space, I add the link for it in the doc. This saves me the headache of loosing the items and never being able to find it again ;) Also important to note is that if I were sourcing for dining chairs, when I do my initial cull of dining chairs that might work, I put the links to ALL options I think have potential. Though I might only show the client a few of those (or even just one in the initial inspiration board), I always want to have back up!
Here's an example of the Google Doc system. The items highlighted in pink are the items I showed my clients in the inspiration board.

For Jean and her dining room, she had already ordered her dining room table, so we were focused on finding chairs, a chandelier, and island lighting that coordinated well with the dining fixture. So instead of just making one inspiration board for the room, I decided to send Jean a few different boards with options. I'm going to share those with you here:
The next board I made was with a slipcovered chair option-- one with an arm and one without. It also included 3 other chair options that reflected the "farmhouse" look Jean told me she wanted, after the initial 3 inspiration boards. Finally, I included 3 island pendant options that coordinated well with the orb chandelier we decided on for the dining room.
I find it SO impactful to show my clients options mocked up, because you don't truly know if you're going to like something together until it's actually visually in front of you (as opposed to sitting on different web tabs, going back and forth to each of them + seeing if they look okay next to each other ;))
table / end chairs- arm, no arm / chair a, chair b, chair c / dining light fixture / pendant a, pendant b, pendant c
She agreed with me, that she loved the slipcovered chair WITHOUT arms for the end chairs. She also told me she preferred option A for the wood chairs, but in black (which I explained in the email was an option). I love adding in the black, because the rug we choose for the family room has black in it, so this will really tie it together. Jean also landed on option B for the kitchen island pendants (there will be 3 in a row...such a statement!)
From there we began choosing fabric for the slipcovered chairs. Jean wanted to see what bringing in some color would look like AND wanted to see a more gray option. I showed her both below, as well as added in the black chairs she decided on and explained that I didn't love the blue tone with the black.
Anyways, here is the final board for the dining room, along with a trio of mirrors that will go in the great room within eye sight. The only thing left to do is find a rug for the dining room + get the art ordered from Feather & Birch. I can't wait to see this space come together!
table / end chairs- sunbrella charcoal / wood chairs / light fixture / kitchen pendant / mirrors
I hope the progression of this design was fun to see come together! I also hope it gives you a bit of a look into how my design process looks. I always tell my clients that this is all about them. The end goal is for them to be happy and love their rooms! So that's why I put so much care into showing them options.
I can't wait to keep you posted with this project and show you how it turns out soon!
xoxo
interior design website / services / portfolio
PS! I'm now taking on clients for June. Email me at hello@michaelanoelledesigns.com to inquire!
PS! I'm now taking on clients for June. Email me at hello@michaelanoelledesigns.com to inquire!


THanks for sharing your process. I would have a difficult time choosing - I love all of the options!
ReplyDelete